
Step One: The Warning
This is cutting, nay, bleeding edge stuff. Not for the feint hearted. Before attempting this project, be prepared for all the things you will need to do:
- Open you home network, securely, to the internet using port forwarding.
- Configure Kodi to be controlled by the internet.
- Create a Platform-as-a-Service (PaaS) application in the cloud. I will show you how to get this at zero cost.
- Create an Amazon developer account (again, free of charge)
- Do lots of gnarly things.
Still with me? Great - lets do this...
Step Two: The Thanks
Let me be clear - this is based on the work of Joe Ipson
http://www.joeipson.com/articles/alexa-kodi/
The only reason I am reproducing this, is to create a step-by-step for my own tiny brain. I am an enterprise engineer, but I am not a software developer. Joe obviously is. OK here we go...
Step Three: Prepare Kodi
Kodi has the ability to be controlled via the internet. The advantage of this strategy is that you do not have to install or maintain any Kodi plugins for this project. However, if you are nervous about granting access, I understand that. Here are some mitigations to consider:
- We will securing this control using certificates. This ensures that the identity of the caller is verified, and that the traffic is encrypted.
- We will be securing this control using a username and a strong password.
So, you will need to go to Settings, Kodi, Services (make sure you are in Advanced View in the bottom left) then Web Server. Switch on the support, then pick a port number, username and password. As you can see I picked 8047 but it can really be anything. Note: I found out to my cost, that if you have configured Kodi to use a central SQL database for multiple Kodi installations, you must use the user name and password associated with the database.

Step Four: Configure Your Router
In a later section, you will learn that we will be creating a cloud application in an environment called Heroku, more of that later, but to allow that, we now need to configure your home router for port-forwarding and dynamic DNS. The former is to allow the traffic through your firewall and into your network securely, the latter is to deal with your ISP occasionally changing the external IP address of your home network. This process is going to vary from one router vendor to another. I use an Asus RT-AC68W, but as a useful hint - YouTube has videos posted on how to do this, on just about every router you can think of. On the ASUS router, you navigate to the WAN page in the Advanced Settings section and the DDNS tab. In the server section you can select any DDNS vendor you like, enter a host name of your choice and hit Apply. Providing nobody else has picked that name, it will register for free. You can verify success by pinging the FQDN (in my case ourhouse.asuscomm.com) from an external source (at work, from a friends house etc). The ping will probably fail as most routers will not respond to a ping for security reasons, but you will see the ping resolve to the external address of your house, which can be verified on a different page.

Now that we have sorted DNS out, we need to allow the traffic from Heroku to pass through your firewall and reach your Kodi installation. We do this using port forwarding. Again, look to Google and YouTube for how to do this on your own brand of router. I will show you on the ASUS.
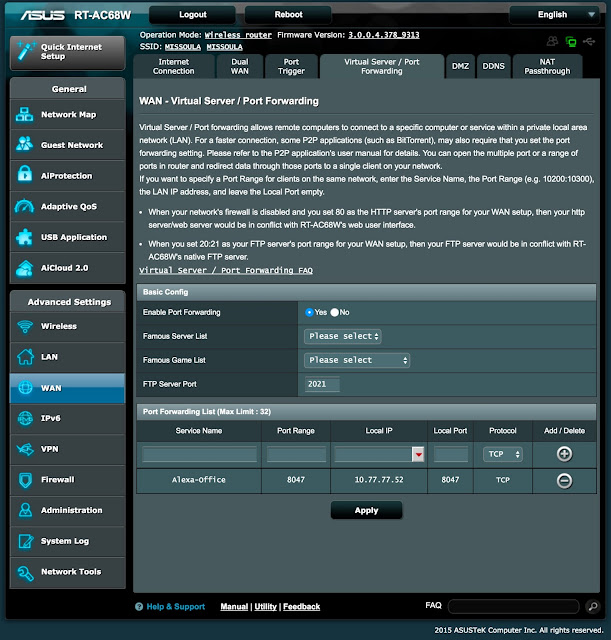
As you can see we are still in the WAN section, but this time we are on the Virtual Server / Port Forwarding tab. The Service Name field is just a label of your choice. The Port Range and Local Port do not have to be the same, but don't get mixed up:
Port Range: A port we will configure into our Heroku application.
Local Port: The port we configured earlier in Kodi
For simplicity here, I have used the same port on both sides of the firewall and ensured that it is the same port that we configured in Kodi.
Step Five: Prepare Development Environment
You are going to need a server, there are many options here including Microsoft Azure, but I prefer Heroku as they have a decent free option, and they are particularly suited to deploy applications in the language we going to use here. This is a PaaS (Platform as a Service) provider:
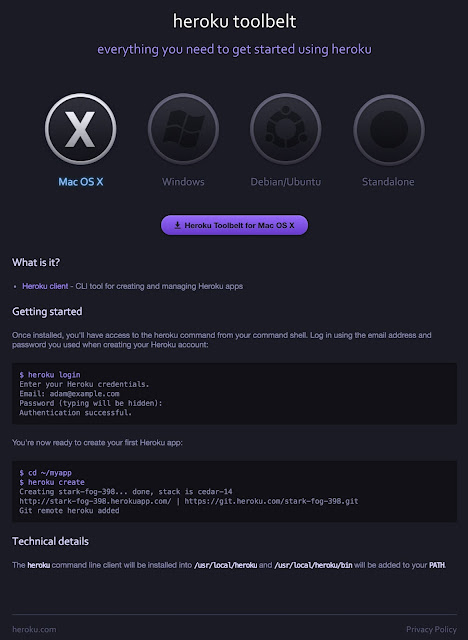
Once you have signed up for a free service, you will need to create a little development environment on a local computer. I have done this using a Mac but the process is really the same on a PC. This does not need to be installed on your Kodi machine, we are just creating a development environment to publish up to Heroku. To do this, install the 'Heroku Toolbelt' by following this link and choosing the OS of your development machine.
Step Six: Create a Heroku Application
Once installed, we need to logon to Heroku at the command line. For me this is the Mac OSX terminal program, if you are on a PC then it will be a Command Prompt. Type:
heroku login
Then enter your credentials. After logging in, we will need to create an application. Type:
heroku apps:create
This will create a new application and allocate a random secret application name for you that comprises adjective-noun-5 digit number. As you can see in the screenshot below, in this example it is sheltered-refuge-88359.
Step Seven: Thank Joe Again!
Now, here comes the gift from heaven, we now copy Joe's work from his repository in GitHub into our application. Type:
Step Seven: Thank Joe Again!
Now, here comes the gift from heaven, we now copy Joe's work from his repository in GitHub into our application. Type:
git clone https://github.com/m0ngr31/kodi-alexa.git
cd kodi-alexa
This has now installed Joe's software into our empty Heroku application shell. Here is a terminal screen-shot of steps four and five. Make a note of the https URL that it outputs.
This has now installed Joe's software into our empty Heroku application shell. Here is a terminal screen-shot of steps four and five. Make a note of the https URL that it outputs.

Step Eight: Configure the Application
Let's gather all the data we will need:
KODI_ADDRESS
This is the address of the outside of your router. In this case, since we have taken advantage of DDNS then this will be the hostname we created i.e. ourhouse.asuscomm.com
KODI_PORT
This is the port number we chose for the outside of the firewall, on the ASUS router this was known as port range, we chose 8047
KODI_USERNAME
This is the username you entered into Kodi earlier, we chose ALEXA-OFFICE
KODI_PASSWORD
This is the password that you entered into Kodi earlier.
APP NAME
This is the application name that Heroku chose for us, which was sheltered-refuge-88359
We configure the application thus, using the options we have configured.
Heroku config:set KODI_ADDRESS=ourhouse.asuscomm.com KODI_PORT=8047 KODI_USERNAME=ALEXA-OFFICE KODI_PASSWORD=MYPASSWORD --app sheltered-refuge-88359
Be careful of word-wrap here. Each environment variable is delimited by a space.
Step Nine: Publish the Application and Start it
Now that we have configured the application, it is time to publish it to the Heroku cloud. This is is achieved using the following command:
git remote add heroku https://git.heroku.com/sheltered-refuge-88359.git
and then
git push heroku master
and then
heroku ps:scale web=1 --app sheltered-refuge-88359
Step Ten: Setup Alexa Skill
We no have to setup a new Alexa Skill, in order to achieve this we will need an Amazon developer account if you don't already have one. This can be done here:
http://dev.amazonappservices.com/AppStore-Landing-Page-1.html
Step Ten: Setup Alexa Skill
We no have to setup a new Alexa Skill, in order to achieve this we will need an Amazon developer account if you don't already have one. This can be done here:
http://dev.amazonappservices.com/AppStore-Landing-Page-1.html
Once you have an account, sign in here:
https://www.amazon.com/developer
Select New App, Mac/PC then select Alexa from the tool bar. That will take you to the list of your skills. Hit the Add a New Skill button. Which will launch the new skill wizard.
First of all you will give your application a name. Since this is just for your own pleasure and not for sale, this can be whatever you want. You will also need to enter an invocation name. This will be the words you use to talk to your Amazon Echo to invoke your skill. Example: "Alexa, ask Kodi to change channels" in this example Kodi is the invocation name. Take care, Kodi is not a word found in the dictionary, so an Amazon Echo will struggle with that, better to use Cody as at least that is a proper noun. Better yet, you could try Media Center or something else. Refer to Amazon's Invocation Name Guidelines:
https://developer.amazon.com/appsandservices/solutions/alexa/alexa-skills-kit/docs/choosing-the-invocation-name-for-an-alexa-skill
Once you have the invocation word(s) set, click next to get to the Interaction Model Screen. Here you will be faced with three sections. The first Intent Schema will contain all the instructions that your skill will know about. This is where we thank Joe Ipson again. Go to his github page, grab the contents of the latest alexa.intents file and paste it into the Amazon developer window.
https://github.com/m0ngr31/kodi-alexa
Next comes the Custom Slot Types. The purposes of the slot types are to allow your Amazon Echo a better chance of understanding your words, especially words that appear in your TV, movies and music list. For example, the Amazon Echo doesn't really need help understanding the words "Dirty Jobs" but it might need help understanding you saying "Doctor Who and the Daleks". So bottom line, you do not need to maintain these as a mirror of your libraries, but the more you add the better. Also consider periodically updating it.
Oh my goodness, we need to thank Joe again. There is a little web application he wrote that will suck out the contents of your Kodi library to help you populate these screen.
https://sleepy-wave-26412.herokuapp.com/
This is also a perfect opportunity to test the DDNS, Port Forwarding and Kodi credentials from earlier on. Here is a screenshot of it working (obviously I have munged the security into fiction.
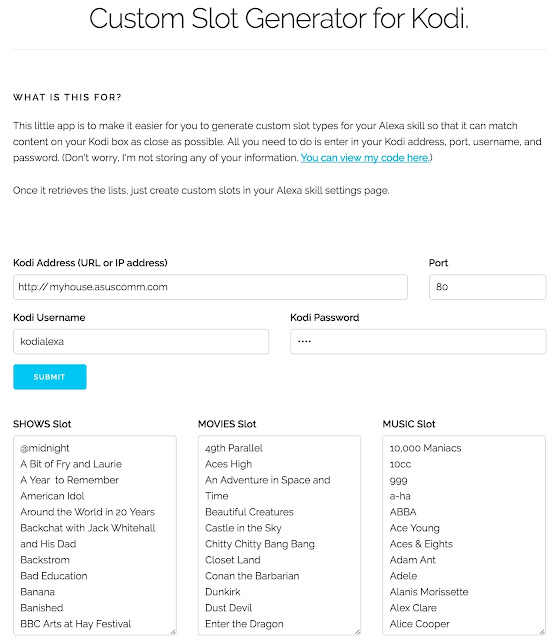
If this doesn't get your data, check your previous work. Assuming we are all good. Hit the Add Slot Type button, name the slot SHOWS and paste in all the shows. Repeat for MOVIES and MUSIC. Next we have the Sample Utterances window. Go back to Joe's github and copy 'n paste the contents of his latest alexa.utterances file. Then hit the SAVE button at the end and hope for no errors.
Hit next and select HTTPS and enter the URL that you noted from step 7. Leave the Account linking question alone and hit next. This will then take you to the SSL Certificate page. Since Heroku uses a wildcard certificate to provide you SSL, then pick the middle option.
Hit next and move the little slider over to test mode. That's all you need here.
Skip the publishing page.
On the Privacy and Compliance page, select the radio buttons to 'NO', check the terms and conditions. DO NOT submit for certification, this is just for your own use and you do not own the intellectual property. Hit save and you are done.
Enjoy!
Hey Mick, I tried following your tutorial on how to connect Alexa with Kodi but have run into a lot of challenges. I.e. https://sleepy-wave-26412.herokuapp.com/ is now a dead link and Alexa skill setup page shows error when I copy paste in all the sample utterances from the linked GitHub file. Is there an updated version of this tutorial perhaps? I've gotten half way there and would hate to give up now. I'd really love to be able to control my Kodi with Alexa. Thanks!
ReplyDeleteHere is the twitter account of the guy that figured this all out and wrote the utility you are looking for. Looks like he is entering his work in an Amazon skill competition, I am sure he would appreciate your support. I imagine he moved his stuff and I just have a bad link. Good luck
ReplyDeletehttps://twitter.com/m0ngr31